Water Efficiency & Drip Irrigation
Build a drip line that runs on gravity, then measure what it actually delivers. A watering kit is one of the simplest things to build and sell, which is why the lab's own drip kit started in this module.
Module sheet 2 of 5
- You make
- A drip line fed by a raised bottle, from tubing and pinholes or from printed parts
- You measure
- Millilitres per minute at each emitter, with the bottle at two or three heights
- Bring
- A 2-litre bottle, a metre of aquarium tubing, a pushpin, a measuring cup, and a phone timer
- Toward a sale
- A kit that waters a bed with no pump and no tap is easy to explain to a buyer. See the lab's kit on Farmish Store
Two ways to build it
The cheap way is tubing, a bottle, and holes you poke yourself. The printed way swaps the holes for parts you design. Most people start with the first and move to the second once they know which part keeps failing.
- Tubing version. Flexible tubing, a bottle or bucket for the reservoir, emitters from pinholes or short micro-tubes, a roller clamp or a knot to slow the flow, and stakes to hold the line down.
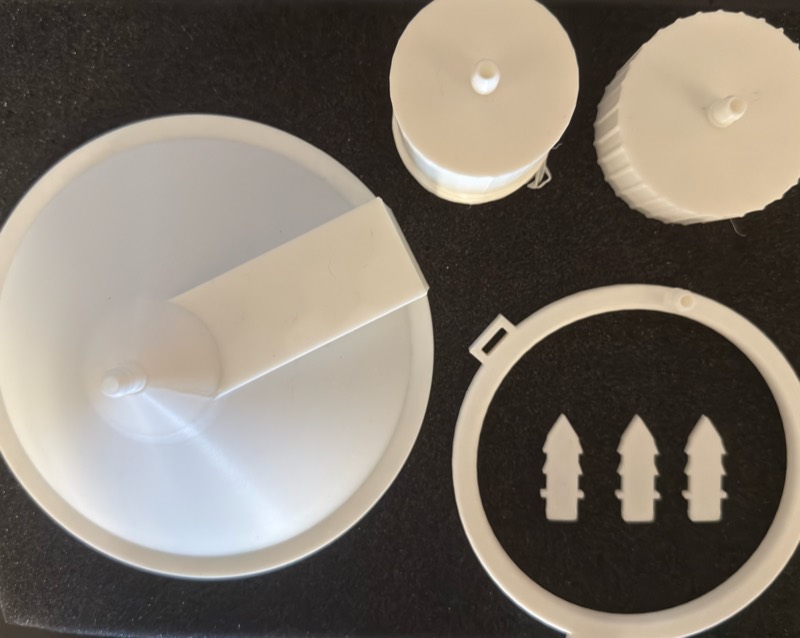
- Printed version. The lab's kit: a ring with a zig-zag channel in its wall, three stakes, a two-part flow controller, and a root cap. Read its build log.
Six builds, smallest first
Each one adds a single change to the last, so when something stops working you know what caused it.
-
First drip line
Push a length of tubing onto a hole in a bottle cap, seal the far end, prick one hole in the tube, and hang the bottle up.
Write downMinutes until the first drop, and anywhere it leaked
-
Flow rate
Catch one emitter's water in a measuring cup for five minutes, then work out millilitres per minute. Repeat with three hole sizes.
Write downMillilitres per minute for each hole size
-
Bottle height
Run the same emitter with the bottle 30 cm, 1 m, and 2 m above it.
Write downMillilitres per minute at each height. Four times the height should give about twice the flow.
-
Soil match
Lay the line across trays of sandy, clay, and mixed soil, run it for 20 minutes, then slice straight down through each tray.
Write downWidth and depth of the wet patch in each tray
-
Emitter prototypes
Make emitters from tape and a needle, a toothpick plug, a micro-tube, or a printed tip, and test each one the way you did in exercise 2.
Write downWhich ran steady, which clogged, and after how long
-
Small grid
Run two to four plants off one bottle, and set each line so a thirsty plant gets more water than a tough one.
Write downTarget and measured flow for each plant
The numbers behind the builds
Worked from the orifice equation: Torricelli's law with a discharge coefficient of 0.6.
-
A 1 mm hole with the bottle 1 m up lets out about 7.5 litres an hour.
Flow = 0.6 × hole area × √(2 × 9.81 × height). For a 1 mm hole at 1 m: 0.6 × 0.785 mm² × 4.43 m/s ≈ 2.1 mL every second.
-
Double the hole's width and the flow goes up about four times.
A circle's area grows with the square of its width.
-
Four times the height gives about twice the flow.
Water leaves the hole at a speed that grows with the square root of the height of water above it.
-
Every metre of height adds about 0.1 bar of pressure.
A metre of water presses with about 9.8 kPa. A household tap usually runs at 2 to 4 bar, so a gravity line works at a small fraction of tap pressure.
-
Drip can use 30 to 70 percent less water than hand watering.
Less water runs off or evaporates, because it goes straight to the roots. The saving depends on the soil, the plants, and the weather.
By the end, you can
- Build a working gravity drip line from scratch
- Measure an emitter's flow and predict it at a new height
- Set emitter spacing and flow for a sandy or a clay bed
- Show a buyer how much water your kit delivers, with numbers
Take it into your project
If your project waters anything, measure it before you sell it: flow per emitter, how long a fill lasts, and the wet patch it leaves behind. Those numbers go on the product card you write in module 5.
Ask about this module